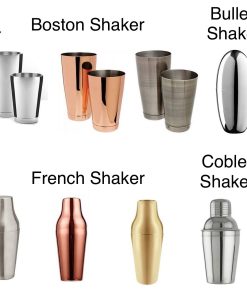
Shake It is a very simple method and one of the most common ways to mix a drink. Combine the ingredients into a shaker tin, add the ice, and then the magic happens. This is useful when the liquids have different densities. As a general rule, almost all drinks that have sugar and/or citrus juice are shaken as this is the best way to mix these ingredients together. Shake around 10 seconds to have a -5°C temperature, so for a short time. Shaken drinks are also aerated. Use when the egg is present. Remember always to strain or double strain the drinks after shaking to avoids any eventually pieces of fruit or especially ice to drop into the drink although sometimes the small pieces of ice, called diamonds can have a great effect on your drink.
The dry shake – you should always dry shake a cocktail with egg white without ice in order to emulsify the egg and then with the ice to create the foam. You can do also the reverse dry shake which I prefer more. Squeeze some citrus essential oils on top of foam to remove the smell of the egg. The positive aspect using egg white in the drink is that you will have a creamy texture but keep in mind that the foam will block the flavours of the drink and in addition using the egg white is not vegan friendly (you can use an alternative such as chickpea water, soapbark). Japanese shake. The inventor of this hard shake technique – an extremely gentle and theatrical way of shaking a drink in a tree piece shaker, is Kazuo Uyeda, a very famous Japanese bartender, the owner of Tender Bar. He swings the shaker gently from side to side. This is done to swirl the liquids inside the shaker for maximum aeration and at the same time reduce the speed of the ice hitting the bottom or top of the shaker.
Did you know… When shaking you will incorporate tiny air bubbles. These bubbles contain aromatic flavour molecules of the ingredients used that will be released on the palate when drinking. For this reason is very important to serve the shaken drinks fast.
Stir is another popular way of mixing method. It is used for drinks with a similar consistency. Stir at least 40 seconds to have a – 4°C temperature cocktail. Over stirring or under stirring can negatively affect the drink as for the temperature and dilution. It is suitable for mixing those cocktails which, containing particularly delicate ingredients such as distilled spirits, wines, and liqueurs (defined in jargon ‘clear‘), that must be simply mixed and not shaken with the shaker.
Build. Some drinks are built directly in the glass, for example a Negroni, but is very important to mix the ingredients inside the glass with a bar spoon up-down as they have different densities so the heavier will go down and the lightest will stay on top; try to avoid this. It is made in the glass in which the cocktail is served and usually a swizzle stick is put into the glass, allowing the drinker to mix them more if desired.
Blending. Use an electric blender when the recipes contain fruit or any other ingredients which don’t break down by shaking. The result is a smooth ready to serve mixture and I highly recommend to use for egg white style cocktails such as Whiskey Sour, Pisco Sour, White Lady.
Layering. To layer or float an ingredient use the back of the spoon in order to have success. Use this technique for an Irish coffee and a White Russian.
Flaming is the method by which a cocktail is set alight, normally to enhance the flavour of a drink. One of the most famous flaming drinks is the Blue Blazer.
Rolling. When you roll a drink, you’re simply pouring the contents of one glass into another glass. Do this a few times and you have a perfectly mixed drink. Rolling can be used instead of shaking or stirring with the aim to mix without adding too much dilution and to slightly aerate the drink. Drinks like Bloody Mary and other cocktails ‘on the rocks’ benefit the most from rolling. How to Roll a Drink Before you begin rolling cocktails and risk wasting precious liquor, practice this technique with water and ice. To avoid cleaning up the floor, you might also want to begin outside until you get confident. Fill one glass with ice and add the liquid ingredients. Pour the contents from this glass into a shaker tin or mixing glass, holding the ice with a strainer. Pour the contents back into the original glass. Continue these last two steps up to five times then strain or pour everything into the serving glass.
Throwing. This technique is similar to the rolling and often exchanged for that in error, but the difference stands in the fact that the liquid is thrown together with the ice from one recipient to another. Repeat this process several times. Use when having very thick liquid ingredients (a Bloody Mary for example). Swizzling is originally a food preparation technique that requires a utensil called swizzle stick that needs to be spun between the palms, lifted and submerged in a mixture. From a liquid perspective, a non-alcoholic precursor to swizzle drinks was Switchel, a spiced mix of water and vinegar that was sweetened with honey or molasses.
Infusion is the process of extracting chemical compounds or flavours in a solvent such as water, oil or alcohol, by allowing the material to remain suspended in the solvent over time (a process often called steeping). An infusion is also the name for the resultant liquid. The process of infusion is distinct from decoction, which involves boiling, or percolation, in which the liquid passes through the material (as in a coffeemaker). To make the infusion you have to consider the size of the particles to be infused, their weight, the temperature, pressure used, time and alcohol content. Smaller is the particles, faster will infuse. Some ingredients extract better in a shorter time, and sometimes a long extraction, especially with herbs can result in bitter components. A warm infusion will be faster than a cold infusion. Try infusing some bergamot leaves in vodka overnight using freezing temperature. Using very low temperature you will extract just the aromatic flavours without extracting the colour and the bitter components.
Maceration is the most common form of infusion. Try to steep into a bottle of vodka some berries and you will have a flavoured vodka. Add sugar and you will have a liqueur.
Pressure infusion. There are several techniques to infuse a liquid with another ingredient and all of them simply consists of placing the solid ingredient in the liquid and leaving it there until the aroma of the ingredient gets absorbed by the liquid. This technique is done under pressure, in a vacuum or at low temperatures. The amount of time required to infuse the liquid depends on type of liquid and the solid ingredient used.
Rapid infusion with the iSi Whip, created by Dave Arnold, Director of Culinary Technology of The French Culinary Institute. Very easy to do it: put the solid flavourful ingredient in the iSi Whip, fill with the liquid to be infused, charge it with N2O, swirl, wait for a minute or so, vent the gas out of the whipper and strain the infused liquid. Pressure infusion works by creating a highly pressured environment inside the container where the ingredients are surrounded by the liquid. The combination of high pressure plus agitation and right amount of time allows the ingredients’ flavours and essences to be squeezed directly into the beverage fluid. You can infuse flavours into alcohol, oils, water, cream using flavourful ingredients like herbs, spices, seeds, fruits and others. Cold ingredients will result in a weaker infusion. Use warm or room temperature foods and liquids for the most flavourful results.
Carbonation One of my favourite ingredients, carbonation is the process that is associated with bubbles and is defined as the saturation of a liquid with CO2 gas. The formula to have a great carbonated drink includes temperature + pressure + surface contact.
-
The liquid is able to absorb more CO2 when it is cold and ideally is to have a temperature close to the freezing point.
-
Pressure is what forces the liquid to absorb the CO2. The amount of CO2 present inside the drink dictates the effervescence on the palate as well as the aroma when the bubble opens in the mouth plus the flavour brought to the nose and keep in mind also the fact that CO2 brings the alcohol in blood faster so can get drunk faster.
-
Surface contact between CO2 and the fluid is where the absorption happens, so try to increase the contact surface so you can inject more bubbles into your drink. Keep in mind that a very important characteristic of the carbonation is not the dimension of the bubbles but the amount of CO2 present in the drink. When carbonating a drink avoid protein ingredients as will foam and also avoid overcharging the recipients for pressure, especially when using soda stream for more than a third. Better carbonating a low abv drink with clarified ingredients in order to have excellent results. Be careful not to increase the pressure too much otherwise it could cause serious damage to both you and your equipment.
Aging. This is an old practice to store everything, even dead bodies (Admiral Nelson’s body was stored in rum to the way back home after died in the battle of Trafalgar). In the case of the barrel aging consider that can be used a cask made of different types of wood, charred or not, refilled or not, previously contained sherry, bourbon or vinegar, therefore can impart the previous characteristics to your aging liquid. The size of the barrel and the time aged are very important factors; smaller means more contact with wood so more complex, and too much contact means too many flavours. As an alternative, it can be used a wood infusion into the liquid. Some winemakers used to infuse wood staves to impart woody flavours to their wine.
Dehydrating is a fun, cost-effective, and easy way to prepare foods and fruits for garnishing your cocktail, for storage, or even for snacking right away. It is very simple and incredibly healthy as dehydrated foods retain their vitamin and mineral content. A food dehydrator is a small kitchen appliance that is used to dry or dehydrate your food. Utilizing a built-in fan and low amounts of heat, this small appliance uses a light flow of hot air to reduce the overall amount of water found in fruits, veggies, meats and other foods. Once the water is removed, the food won’t spoil as quickly as it normally would, and it is also impervious to many kinds of bacteria that would otherwise grow. A food dehydrator allows you to retain all of those nutrients and vitamins within your fruits and especially can be used to avoid any fruit waste. The temperature and time required to adequately dehydrate will vary depending on the type of dehydrator you buy, as well as the fruit you want to dehydrate. General time and temperature guidelines will be printed on the dehydrator label or included in the instruction manual along with suggested times needed. In order to be stored properly, foods need to be at least 95% dehydrated.
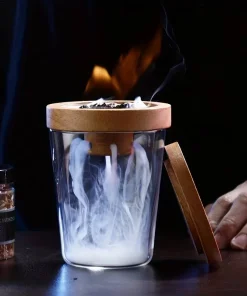
Smoking is one of the oldest food preservation methods, probably having arisen shortly after the development of cooking with fire. The practice attained high levels of sophistication in several cultures, notably the smoking of fish in Scandinavia and north-western North America and the production of smoked hams in Europe and the United States. Interest in smoking meats declined during the mid-20th century owing to the popularity of chemical preservatives. In modern days, the smoking process is better understood and has the role not just in preserving but also to flavour (increasing the food palatability), browning (imparting a rich brown colour), cooking. It is done by exposing the food to smoke from burning or smouldering material, most often wood. Most of the positive aromatic effects of smoke derived from the breaking down of the lignin present in the wood. Use the smoking gun to easily direct the smoke into the desired vessel, cloche, mixing beaker, or glass. The draw of air through the crucible causes the smouldering wood to heat sufficiently without catching alight. The type of wood used will have a bearing on the type of smoke that is produced. Some examples: hickory (sweet aromatic aroma, is used typically on a barbeque); apple (lighter aromatic, but a pleasant fruity characteristic); oak (very bold and intense, use carefully to do overpower); mesquite (strong and rich aromatics).
Clarification. The roots of this technique are very deep in the past and according to cocktail historian Dave Wondrich, using milk to clarify a punch has been practiced since at least the early 18th century. Since many punches are acidic, milk was added in an attempt to mitigate its effects on the stomach. This is still a very common technique in modern days and can be used different types of milk such as cow, sheep, or even vegetable milk: almond, oat, soya, etc. This technique consists in removing suspended particles and separating clear liquids from cloudy solids. The reasons to clarify a liquid can be countless –purer looking drink, great potential for a good carbonation outcome, incorporating a silky texture. There are several clarification techniques and before you decide which technique to use you need to evaluate your liquid – how long it’s going to last, if its heat-stable, its acidity, and the density of the liquid.
Filter clarification – blocks particles allowing only the clear ones to come through. This type of clarification requires very fine strainers.
Gel clarification – particles are trapped in a gel and then the clear liquid leaks out. Firstly, you need to incorporate your gelling agent into the liquid and then decide whether to use a freezing process or agar. When agar is used, keep in mind that needs to be heated to a boil to be dispersed into the liquid. Many advantages: vegetarian-friendly, leaks more than gelatine, the gel is formed before the process begins so you can verify that it will work, much faster process. The negative aspect is that it needs to be boiled to fully incorporate. This method doesn’t work for liquids that don’t last long such as citrus juice.
Centrifuge clarification – much quicker and effective although the most expensive option, centrifuge spins the liquid using a high speed and gravitational pull.
Egg white –traditionally used to filter impurities from liquids. A rotavap is commonly used and also the most expensive option.
Did you know… Hydrocolloids are a family of compounds that can be used to thicken liquids, strengthen ice creams, create alcoholic jellies and jams, stabilize foams and airs, emulsify fats into an aqueous (water-based) solution and create fluid gels. Use xanthan gum into your sugar syrup and you will have an elastic, firmer texture.
Gelification is defined as the process of turning a substance into a gelatinous form. With this process, liquid substances are converted into solids with the help of a gelling agent. Common gelling agents come from natural sources and include agar-agar, gelatine, carrageenan, gellan gum, pectin, and methylcellulose. More often these gelling agents are presented in a dry, solid form that needs to be hydrated. It can serve to stabilize liquids without affecting taste. It may also be used for suspending food particles and creating various shapes for aesthetic purposes. Lastly, it can also be used to create various textures and improve dining experiences. Most of them result in some kind of solid structure that traps liquid in it. The structure is often made of proteins and gives form and body to the gel. There are many different gelling ingredients. Below is a short description of several gelling agents:
Agar-agar (usually abbreviated as agar) creates brittle gels, and it must be brought to a boil to hydrate. It sets at room temperature and can be heated to 80°C (176°F) before melting. Agar is typically used in a ratio of 0.2% to 3.0%. For soft gels a 0.2% to 0.5% range is ideal, and the gel becomes harder as more agar is added. Locust bean gum can be added to make the gel more elastic, usually by replacing 10% of the agar with locust bean gum.
Gelatine needs to be dispersed in hot liquid to form elastic gel. The ratio indicated range from 0.5% to 1.0% for soft, tender gels. For very hard, firm gels can be used in ratios of upwards 6% but the typical range for medium-firm gels is 1% to 3%. If you are using sheet gelatine you will use 0.3 to 0.5 sheets per 100 grams of liquid for soft gels and 0.5 to 1.66 sheets per 100 grams of liquid for firmer gels. For very firm gels more than 3.3 sheets per 100 grams of liquid are sometimes used.
Methylcellulose has the uncommon ability to gel as it heats and melt as it cools. There are many different types of methylcellulose available for a variety of uses. For making foams, a ratio mixture of 1.0 to 2.0% Methocel F50 with 0.1 to 0.3% xanthan gum is commonly used. For gels, a ratio range of 0.25 to 3.0% Methocel A4C is a good starting point.
Lecithin is ideal for making not just foams but also airs mousses and emulsions. Most commercial lecithin is extracted from soybeans, making it both vegetarian and vegan friendly. Lecithin contains both hydrophobic (water-hating) and hydrophilic (water-loving) groups, so it can also be used in making emulsions. Under normal circumstances oil and water do not mix and separate out, creating two distinct layers, but an emulsifier such as lecithin helps to combine these two layers, creating a more stable preparation.
Soya lecithin should be used in a concentration of 0.3to 0.8% for foam and 0.5 to 1% for emulsions.
Foaming this is another way to make your drink more interesting. It is different than air (light foam) through its creaminess, rich mouthfeel, and viscosity. It is not complex if you think of a pint of Guinness or a cappuccino. Using fresh egg white in drinks is the most common option used. Pasteurised and powdered egg white (albumin) are other options even though are not vegan friendly and contain allergies. Other alternatives are represented by some egg-free hydrocolloids that we just covered earlier and use in 1% ratio powder to liquid normally. For the foam to hold its shape for a period of time there must be some form of thickening or gelling agent present in the liquid and adding a touch of xanthan gum (a popular food additive that’s commonly added to foods as a thickener or stabilizer) your foam will highly benefit. Once you have mixed the ingredients place them in a cream whipper and then ‘charge it’ using nitrous dioxide (N2O) to be whipped.
Fermentation is a mechanism that consists of converting carbohydrates to alcohol or organic acids using microorganisms – yeasts or bacteria – under anaerobic conditions and there are two types of fermentation: lactic acid fermentation – when yeasts and bacteria convert starches or sugars into lactic acid in foods like pickles, sauerkraut, sourdough bread, and yogurt, and alcoholic fermentation that produces alcohol and carbon dioxide.
Pickling. In short, pickling is a process that consists of preserving or extending the shelf life of food by either anaerobic fermentation in brine or immersion in vinegar. This wonderful operation is mainly utilized for solid ingredients, changing their taste, flavour, and texture, however, can be used to substitute the citrus’ acidity in cocktails by pickling juices and one of my favourite is pickled mango juice to use in a spicy Margarita. Fat washing. An old perfumer’s technique called enfleurage, the fat washing is another great technique that will incorporate creaminess into your cocktail and consist in infusing rich fat- based savoury ingredients such as oils, butter, avocados, bacon, etc into alcohol and using lower temperatures, the liquid is then frozen and the fat is separated due to the different freezing points. You still need to first transform your chosen fat into a liquid form and combine it with the alcohol and then filtered it various times through coffee filters or cheesecloth for optimal results. This technique is possible as alcohol can dissolve oil-based molecules and the ratio suggested is 6 parts alcohol to 1 part fat for powerful tasting fats and 3 to 1 for less powerful fats such as oils and butter.
Grilling is another personal favourite technique and consists of using direct or indirect heat applied to the surface of the food ingredients. The great aspect of this technique is that will caramelize the sugars present in the ingredient used for the cocktail and will give wonderful flavour notes, depth and complexity to the final result.
Spherification. The process is linked with the renowned chef Ferran Adrià. Spherification is a magic process that creates a gel around a liquid, forming a gelled sphere with a liquid centre. Sodium alginate (a thickening agent extracted from seaweed) is commonly used in spherification because of its ability to gel in the presence of calcium ions such as calcium chloride, lactate or gluconate lactate. Calcium gluconate lactate for its neutral flavour is the most suitable for reverse and frozen reverse spherification (my favourite as can be prepared in advance and last up to three days when conserved in water or preferably in the liquid that has been used to make the drink – ex: Negroni sphere in Negroni liquid). The difference between reverse spherification and direct spherification is where the gelling agent is put: in reverse spherification, the gelling agents are added to the setting bath, while in direct spherification is placed in the base. It can be dispersed and hydrated at almost any temperature and the gels are very heat tolerant. For direct spherification, a 0.5% to 1% sodium alginate base is used with a 0.5% to 1% calcium gluconate lactate setting bath. For reverse spherification a 1.0% to 3.0% calcium gluconate lactate base is used with a 0.4% to 0.5% sodium alginate bath.

